Contact us for all your culinary needs

Phone Number:
(780) 289-7220
Email: bolasterscatering@telus.net

Follow us for daily tips on Twitter & the Bolsters Catering Facebook page

Tuesday, February 1, 2011

Okayu Recipe (rice porridge)

Plain steamed rice is an essential item for Japanese-style breakfast. Okayu (rice porridge) is easy to digest and is good for breakfast too. Okayu is easy to digest and is easy to eat. When you have a stomachache or have a cold, okayu is a good food to eat.

This is a recipe to make plain okayu. You might want to add some vegetables or meat, depending on your appetite. (For example, boiled chicken, boiled shrimps, boiled scallops, mushrooms, daikon radishes, and so on.)

Yield: 2 servings

Ingredients:

  • 1/2 cup Japanese rice
  • 3 cups water
  • 1/2 tsp salt
  • *some chopped green onion
  • *sesame seeds
  • *umeboshi (pickled plum)

Preparation:

Wash Japanese rice and drain. Put water and rice in a heavy bottomed pot or earthenware pot. Leave it for about 30 minutes. Cover the pot and put it on medium-high heat and bring to a boil. Turn down the heat to low and cook the rice for about 30 minutes. Stop the heat and let it steam for about 10 minutes. Season with salt before serving. Put toppings, such as chopped green onion, sesame seeds, and umeboshi (pickled plum) if you would like.


Basic Miso Soup


I think just about everyone loves a steaming hot cup of miso soup! With a soothing and mild flavor, miso soup is light and "brothy", not the type of soup that is a meal on its own, so serve as an appetizer. Miso soup is a quick, easy and light soup and is a staple of Japanese cuisine. This basic recipe is a simple version of the classic miso soup you'll find served in Japanese restaurants. Try this Vegetable miso soup recipe for a heartier soup.

Ingredients:

  • 4 cups water
  • 1/3 cup miso
  • 3 green onions (scallions), chopped
  • 1 tbsp shredded nori or wakama seaweed
  • 1/2 block firm silken tofo, cut into 1 inch cubes
  • dash soy sauce (optional)
  • 1/2 tsp sesame oil (optional)

Preparation:

Bring water to a slow simmer and add seaweed. Allow to simmer at least 5-6 minutes. The longer you simmer the seaweed, the less of a salty fishy flavor it will have.

Reduce heat to very low and add the rest of the ingredients. Stir until miso is well dissolved. Its best not to boil the miso, as this will ruin some of it's healthy properties as well as change the flavor of the soup. Makes 4 servings.

Wednesday, September 29, 2010


Surprisingly, there is very little advice on the net for sharpening a potato peeler, and yet it is a simple and effective procedure. Many would ask, "Why sharpen a peeler when they are cheap to replace?". Simply because even brand new, a peeler works best when it's sharp - and even new ones are sometimes dull. Additionally, we live in a "throw away" society, and if you are like me, you'd like to resist the urge to just toss everything at the first impulse. So, simply follow these instructions, and your peeler can become a family legacy you can leave to your grandkids!

By running the tip of a paring knife along each blade of your peeler, the metal-on-metal action will restore some of your blade's edge. Most don't even notice their peelers starting to dull, but once you give this tip a try you'll dig how much less resistance you'll have as you take on potato after potato, carrot after carrot, this holiday season.

The same trick can be applied to any metal grater or blade in your kitchen. If you have the patience, try sharpening up your box grater or cheese slicer. Hit up discount stores, as you can usually find paring knives right around the dollar mark, and you won't mind if they get roughed up a bit.

Tuesday, September 21, 2010

Spaghetti Squash

The flesh of spaghetti squash comes out in long strands, very much resembling the noodles for which it is named. In this recipe, the 'noodles' are tossed with vegetables and feta cheese. You can substitute different vegetables, but be sure to use ones that have contrasting colors.

Serves 6

Ingredients

  • 1 spaghetti squash, halved lengthwise and seeded
  • 2 tablespoons vegetable oil
  • 1 onion, chopped
  • 1 clove garlic, minced
  • 1 1/2 cups chopped tomatoes
  • 3/4 cup crumbled feta cheese
  • 3 tablespoons sliced black olives
  • 2 tablespoons chopped fresh basil
Directions
  1. Preheat oven to 350 degrees F (175 degrees C). Lightly grease a baking sheet.
  2. Place spaghetti squash cut sides down on the prepared baking sheet, and bake 30 minutes in the preheated oven, or until a sharp knife can be inserted with only a little resistance. Remove squash from oven, and set aside to cool enough to be easily handled.
  3. Meanwhile, heat oil in a skillet over medium heat. Saute onion in oil until tender. Add garlic, and saute for 2 to 3 minutes. Stir in the tomatoes, and cook only until tomatoes are warm.
  4. Use a large spoon to scoop the stringy pulp from the squash, and place in a medium bowl. Toss with the sauteed vegetables, feta cheese, olives, and basil. Serve warm.

Wednesday, July 14, 2010

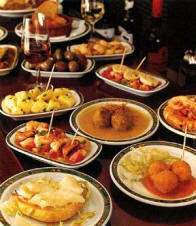
"Tapas" is the name of a wide variety of appetizers, or snacks. They may be cold (such as mixed olives and cheese) or warm. Tapas have evolved to become a key part of sophisticated cuisine, as more restaurants add tapas to their menu and people start experimenting in their home with a variety of items including delicious dips like Summer Fresh Original Hummus or Summer Fresh Tzatziki.

DÉCOR - Hosting your party outside is the perfect venue to compliment the food being served.

• To create an authentic experience, purchase a low table (similar to ones at authentic Japanese restaurants) and place large, over stuffed pillows in bold colours like pink, orange and teal on the ground around it. This will be the seating area.

• Place glass vases on the table to hold bamboo skewers and toothpicks to pick up food.

• Place an empty shot glass, or empty votive candle holder at each place setting for empty toothpicks.

• Set out pitchers of water, or sparkling water, along with white and red wine on ice.

• For a centerpiece place a line of pink or orange tea light holders down the middle of the tables and light the candles.

• If you want a bold centerpiece, fill a large vase with fresh, cut sunflowers.

FOOD EXPERIENCE – Create a decadent array of finger foods inspired by Spain!

• Set out dishes of olives, pita bread, oil and Summer Fresh Roasted Red Pepper Hummus.

• Fill a shot glass with Summer Fresh Seven Grain Salad for individual servings.

• Create “Patatas Bravas” by slicing russet potatoes into circles, brushing with Summer Fresh Spicy Artichoke & Asiago Dip and pan frying them. Serve HOT.

• Drizzle Summer Fresh Provolone & Onion Hot Cheesy Dip over grilled shrimp and skewer with grilled mushrooms.

• Spread Summer Fresh Spicy Hummus onto one side of a sliced baguette; add grilled chicken and Summer Fresh Taboulah Salad. Top with additional slice and cut into small pieces.

• Grill naan bread and cut into wedges. Serve with Summer Fresh Baba Ghanouj.

• Stuff button mushroom caps with Summer Fresh Greek Couscous Salad and serve with a tablespoon of Summer Fresh Roasted Garlic Hummus.

• Slice a cucumber in half lengthwise and scoop out a trough down the middle. Mix together Summer Fresh Bruschetta and feta cheese and fill the trough. Slice into 2" lengths and serve.

• Spread Summer Fresh Sundried Tomato & Kalamata Olive Feta Spread on to a slice of prosciutto and roll over a spear of asparagus.

• Pour Summer Fresh Sundried Tomato & Parmesan Dip over cooked meatballs, pierce with a toothpick and serve.

• For dessert, spoon Summer Fresh Maple Walnut Topping into chocolate shells.

• Spread Summer Fresh Cranberry Pomegranate Topping over a brick of cream cheese and heat for 10 seconds. Serve with Graham crackers.

APRÉS DINNER – As dinner winds down, sit back under the stars and relax!

• Provide guests with a variety of beverages including red & white wine, sangria, coffee and water.

• Put on some Spanish music and encourage your guests to get up and dance!

• As a party favour, create recipe cards for the tapas foods your guests have enjoyed.

Wednesday, May 19, 2010

Deep Fat Frying Tips


With health consciousness at such a high point these days, many people do not deep fry foods. But sometimes some fried food is just what you want! If you're going to consume the calories, make sure that the food is perfectly fried with these tips.

Deep fat frying is a dry heat cooking method. I know that sounds strange, but it's considered dry because no water is used, unlike poaching, microwaving, or simmering. Here's how to do it:

  • To start, choose your cooking oil carefully. Oils with high 'smoke points', in other words, those which do not break down at deep frying temperatures, are best. Peanut oil, safflower oil, sunflower oil, and canola oil are some good choices.
  • Choose a deep, very heavy skillet to fry with. Add oil to the cold pan, leaving a headspace, or space at the top of the pan, of at least two inches. This allows a safety margin when the oil bubbles up as the food is added.
  • Make sure that the food you're going to fry is dry. Letting it sit on paper towels, or coating it in flour or bread crumbs is a good way to ensure this. Let the coated food sit on a wire rack for 20-30 minutes so the coating dries and sets.
  • Begin heating the oil over medium high heat. If you have a deep fat frying thermometer, use it! The best temperature is 350 to 375 degrees F. If you don't have a thermometer, the oil is ready when a 1" cube of white bread dropped into the oil browns in 60 seconds; that oil temperature will be about 365 degrees F.
  • Don't overcrowd the pan! Carefully add the food, leaving lots of space around each piece so the food will cook evenly. If you add too much food at once, the oil temperature will drop and the food will absorb fat instead of instantly searing.
  • Watch the food carefully as it cooks, regulating the heat if necessary to keep that oil temperature between 350 and 375 degrees F. When the food is browned according to the time in the recipe, it's done. Remove it with a slotted spoon or a heavy stainless steel sieve with a long handle. Drop it onto paper towels to drain.
  • Fried foods can be kept warm in a 200 degrees F. oven until all the food is fried.
  • Oil and water DO NOT MIX!! Keep water away from the hot oil. If you pour water on the oil, the mixture will explode. If the oil smokes or catches fire, cover it with a pan lid or cookie sheet. You can use baking soda to put out any grease fires, but be careful that you don't spread the flames around.
  • I always keep a fire extinguisher in my kitchen, just in case. Learn how to use it NOW, before you may need it.
  • Don't reuse the cooking oil. Some sources say you can strain it and reuse it, but the oil has already begun to break down from the heat, and undesirable compounds like trans fats have formed. Let the oil cool completely, then discard safely.

Monday, May 17, 2010

Tips to the art of grilling

Grilling is an art, no doubt of that, and getting the food right is a matter of practice and technique. So, if you are having trouble getting your grilled foods to turn out just right, follow these grilling tips and tricks to ensure the best flavor for your grilled foods:

grilled food

If you follow a few simple tips and tricks, you can transform your grilled food into works of art.

1. Charcoal readily absorbs and holds moisture, so store it in a dry place.

2. To make cooking go faster, partially cook food in the microwave or on the range, and then immediately finish cooking the food on the grill. You'll get that barbecue flavor in less time.

3. Soak wooden skewers and toothpicks in water for at least 20 minutes before using them on a hot grill. The absorbed water will prevent the wood from burning.

4. The easiest way to clean a soiled grill is to scrub it with a stiff, wire brush while it's still warm.

5. While cooking, keep the fop and bottom grill vents open. Close them when cooking is finished to extinguish the coals.

6. Use tongs or a spatula to turn meat. Piercing it with a fork causes precious juices to escape.

How Hot Is It?
Your recipe says to heat the charcoal grill to 375°F. Like most cooks, you probably guess and then hope for the best. But there is a pretty reliable way to gauge the temperature of the coals without resorting to ripping the thermometer off the deck railing.

A quick and easy way to estimate the temperature of the coals is to hold the palm of your hand about four inches above the coals. Count the seconds you can hold your hand there before the heat forces you to pull it away. Then use the handy chart below to determine the temperature.­

­ ­
SecondsCoal Temperature
2 375°F or more
3 350° to 375°
4 300° to 350°
5 200° to 300°

MEAT, POULTRY, AND FISH GRILLING CHART
Use the following as a guide to approximate cooking times. You can also determine how well cooked your meat is with a good meat thermometer. Medium-rare beef will register 150°F on a meat thermometer; poultry, 180°; pork, 160°; lamb, 160°.

MeatThickness/WeightApprox Cooking Time (over med heat)
Chicken Boneless skinless breasts5 minutes per side
Chicken
Cut-up broiler/fryer
45 to 60 minutes
Fish fillets6 ounces3 to 5 minutes per side
Fish steaks1 inch5 minutes per side
Hamburgers 1/2 inch14 to 16 minutes
Pork baby back ribs 31/2 to 4 pounds30 to 45 minutes
Pork loin chops 3/4 inch10 to 12 minutes
Porterhouse/T-bone steak 3/4 inch14 to 17 minutes
Ribeye steak
3/4 inch6 to 8 minutes
Sausages
10 minutes
Shrimp Medium
2 to 3 minutes per side
Sirloin steak3/4 inch13 to 16 minutes

VEGETABLE GRILLING CHART
Brush vegetables lightly with vegetable oil and/or an oil-based salad dressing or marinade of your choice; season with sprinklings of chopped fresh or dried herbs, salt or pepper. Place large cuts directly on grill; grill smaller cuts in a grid basket.

VegetablePreparation for Grilling Grilling Time
Bell or chili peppersWhole or halved, stemmed and seeded 10 to 20 minutes
Corn on the cobUnhusked; remove silk; Soak in cold water 30 minutes
20 to 30 minutes
Eggplant Cut into 1-inch thick rounds 20 minutes
Mushrooms Stems removed 10 minutes
Onions Peel; cut into halves, wedges, or rounds; insert wooden picks to prevent separating. 20 to 30 minutes
Potatoes Cut into 1/2-inch thick rounds
10 to 12 minutes
Summer squashCut into halves or thick slices 5 to 10 minutes
Tomatoes Cut into halves or thick slices 5 to 10 minutes